This following guide explains how to configure one of our 'Reseller' accounts and create individual server accounts within it.
Our reseller accounts allow you to create and manage multiple radio server accounts from the just the one master server account.
In order to set up a reseller account with us, we require a minimum monthly subscription of 1000GB of bandwidth per month. If you are interested in setting up a reseller account with us, then please contact us via our contact form.
Creating a 'New Account':
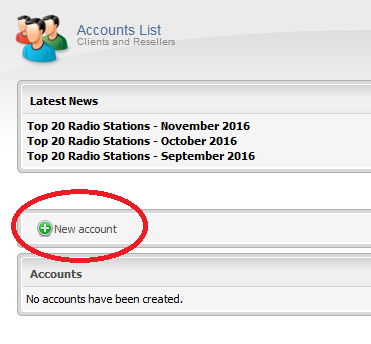
Once your reseller account has been set up and you have been provided with the login information for it, on the reseller 'Overview' page of the control panel press the 'New Account' button.
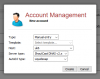
Next, an 'Account Management' window will open.
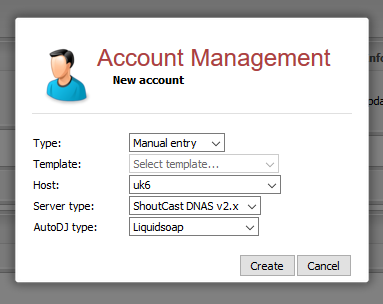
To create a new server account you are provided with the following options:
Type: Select 'Manual Entry'.
Host: Select the server number and location that you wish to create the account on. *Please see some more information on this below.
Server Type: Select the chosen server type from either Shoutcast D.N.A.S v2 or Icecast v2. (We no longer offer Shoutcast D.N.A.S v1 to new clients, however at the moment v1 servers are still available from within reseller accounts. We highly recommend opting for v2 over v1 due to the following issue).
AutoDJ Type: Select the AutoDJ type, for this we highly recommend selecting 'Liquid Soap'.
*For the 'Server Type' you should always choose the highest server number for the country that you want the server hosted in. So for example you should select the 'us4' server (United States 4) instead of 'us1' or the 'uk6' server (United Kingdom 6) instead of 'uk1'. The reason for this being that the higher the server number, the less other accounts that are also hosted on that same server.
Next, click on 'Create'.
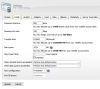
Configuring the accounts 'Stream' settings:
The 'Stream' tab is where you set the basic configuration settings for the account/station.
Username: Here you enter the username for the account. *Please note that the username cannot contain any spaces, capitalisations or special characters in it.
Hostname: Here you enter the accounts 'Hostname' address. *Please see the "Configuring the Hostname" section below.
IP address: Leave this set to 'auto'. This will automatically be assigned to the account by using the default IP address for the hosting server.
Port: Leave this set to 'auto'. This will automatically assign an available port to the account.
Stream title: Here you enter the title of the stream/station.
E-mail address: Enter the associated email address for the account to receive notifications.
Company/organization: Enter the accounts company/organization information.
Website URL: Enter the URL for the stations own website.
Source password: Set the accounts 'Source' password. *See below
Administrator password: Set the accounts 'Admin' password. *See below
*The 'Administrator' password is for logging into the control panel and admin areas of your server. The 'Source' password is for your DJ's to use purely to broadcast a live source to the server (along with the hostname / port). We highly recommend that you set a unique password for each.
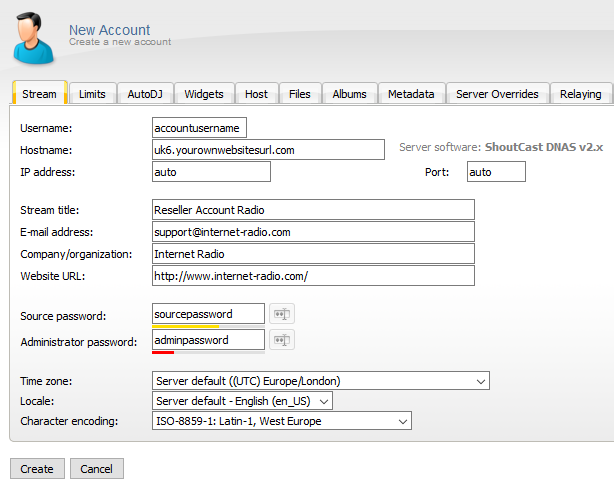
Configuring the 'Hostname':
*The hostname is used by the server software to generate the tune-in links for the station and it is therefore important that this is set correctly.
When creating a new account by default the hostname is always set as "example.com". You should change this to the hostname of the server you chose so for uk6 it's "uk6.internet-radio.com" etc...
Advanced users can however change this to reflect their own stations/company/organisation's domain name instead if you have previously setup the A record to point to our relevant IP. So for example "uk6.yourownwebsitesurl.com".
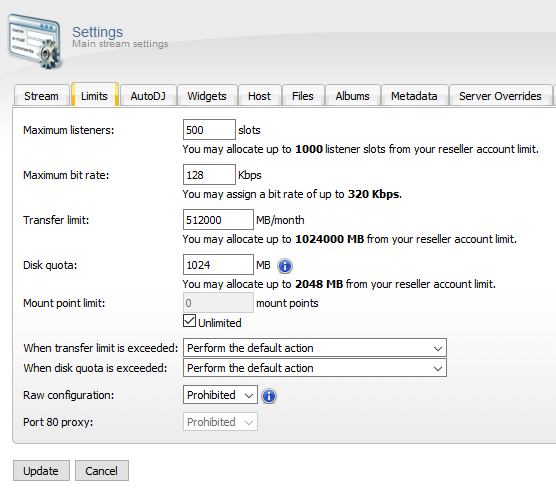
Configuring the accounts 'Limits' settings:
The 'Limits' tab lets you configure the limits and restrictions for the stream.
Maximum listeners: Set the maximum amount of listeners slots you would like for the account. So for example, if you had a listener limit of 1000 and you created two server accounts you could allocate 500 listener slots to each account.
Maximum bitrate: You can set the maximum bitrate for the account up to and including 320kbps.
Transfer limit: Here you can allocate the data transfer limit by the amount of MB's per month for the account from your reseller accounts monthly bandwidth limit. So for example, if you had a monthly bandwidth limit of 1024000 MB (1000GB) per month and you created two server accounts you could allocate 512000 MB (500GB) to each account.
Alternatively, if you create several accounts we would recommend setting this to 0mb (unlimited) on each account to prevent any issues should a particular account exceed its data transfer limit before the end of the month. We would generally recommend this instead for setting the data transfer limit for each account.
Disk quota: This is where you allocate the amount of AutoDJ storage space to the account. So for example, if you had a total storage limit of 4 GB (4096 MB) and you created two server accounts you could allocate 2 GB (2048 MB) to each account. Or say you had created four accounts then you could allocate 1 GB (1024 MB) to each of these accounts.
Mount point limit: Here you can set the amount of mount points for the account. We would recommend just leaving this set to "Unlimited".
")
Our reseller accounts allow you to create and manage multiple radio server accounts from the just the one master server account.
In order to set up a reseller account with us, we require a minimum monthly subscription of 1000GB of bandwidth per month. If you are interested in setting up a reseller account with us, then please contact us via our contact form.
Creating a 'New Account':
Once your reseller account has been set up and you have been provided with the login information for it, on the reseller 'Overview' page of the control panel press the 'New Account' button.
Next, an 'Account Management' window will open.
To create a new server account you are provided with the following options:
Type: Select 'Manual Entry'.
Host: Select the server number and location that you wish to create the account on. *Please see some more information on this below.
Server Type: Select the chosen server type from either Shoutcast D.N.A.S v2 or Icecast v2. (We no longer offer Shoutcast D.N.A.S v1 to new clients, however at the moment v1 servers are still available from within reseller accounts. We highly recommend opting for v2 over v1 due to the following issue).
AutoDJ Type: Select the AutoDJ type, for this we highly recommend selecting 'Liquid Soap'.
*For the 'Server Type' you should always choose the highest server number for the country that you want the server hosted in. So for example you should select the 'us4' server (United States 4) instead of 'us1' or the 'uk6' server (United Kingdom 6) instead of 'uk1'. The reason for this being that the higher the server number, the less other accounts that are also hosted on that same server.
Next, click on 'Create'.
Configuring the accounts 'Stream' settings:
The 'Stream' tab is where you set the basic configuration settings for the account/station.
Username: Here you enter the username for the account. *Please note that the username cannot contain any spaces, capitalisations or special characters in it.
Hostname: Here you enter the accounts 'Hostname' address. *Please see the "Configuring the Hostname" section below.
IP address: Leave this set to 'auto'. This will automatically be assigned to the account by using the default IP address for the hosting server.
Port: Leave this set to 'auto'. This will automatically assign an available port to the account.
Stream title: Here you enter the title of the stream/station.
E-mail address: Enter the associated email address for the account to receive notifications.
Company/organization: Enter the accounts company/organization information.
Website URL: Enter the URL for the stations own website.
Source password: Set the accounts 'Source' password. *See below
Administrator password: Set the accounts 'Admin' password. *See below
*The 'Administrator' password is for logging into the control panel and admin areas of your server. The 'Source' password is for your DJ's to use purely to broadcast a live source to the server (along with the hostname / port). We highly recommend that you set a unique password for each.
Configuring the 'Hostname':
*The hostname is used by the server software to generate the tune-in links for the station and it is therefore important that this is set correctly.
When creating a new account by default the hostname is always set as "example.com". You should change this to the hostname of the server you chose so for uk6 it's "uk6.internet-radio.com" etc...
Advanced users can however change this to reflect their own stations/company/organisation's domain name instead if you have previously setup the A record to point to our relevant IP. So for example "uk6.yourownwebsitesurl.com".
Configuring the accounts 'Limits' settings:
The 'Limits' tab lets you configure the limits and restrictions for the stream.
Maximum listeners: Set the maximum amount of listeners slots you would like for the account. So for example, if you had a listener limit of 1000 and you created two server accounts you could allocate 500 listener slots to each account.
Maximum bitrate: You can set the maximum bitrate for the account up to and including 320kbps.
Transfer limit: Here you can allocate the data transfer limit by the amount of MB's per month for the account from your reseller accounts monthly bandwidth limit. So for example, if you had a monthly bandwidth limit of 1024000 MB (1000GB) per month and you created two server accounts you could allocate 512000 MB (500GB) to each account.
Alternatively, if you create several accounts we would recommend setting this to 0mb (unlimited) on each account to prevent any issues should a particular account exceed its data transfer limit before the end of the month. We would generally recommend this instead for setting the data transfer limit for each account.
Disk quota: This is where you allocate the amount of AutoDJ storage space to the account. So for example, if you had a total storage limit of 4 GB (4096 MB) and you created two server accounts you could allocate 2 GB (2048 MB) to each account. Or say you had created four accounts then you could allocate 1 GB (1024 MB) to each of these accounts.
Mount point limit: Here you can set the amount of mount points for the account. We would recommend just leaving this set to "Unlimited".