This following guide explains how to enable the AutoDJ feature on your servers account and also use the AutoDJ's 'File Manager' interface in the Centova Cast v3 control panel. The 'File Manager' is a complete management system for the uploading and organizing of your radio station's media files for use with the feature.
Enabling the 'AutoDJ' feature
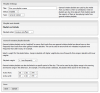
First off, you are going to need to enable the AutoDJ feature on your account. In order to do this, first navigate to your servers 'Configuration' menu and then the 'Settings' link below this. Under the 'AutoDJ' tab's settings you will see the 'AutoDJ Status' drop down menu. Upon your account registration, this is automatically set by default to “Permitted, but disabled”. All you need to do is use this drop down menu to select “Permitted and enabled” and then click on 'Update' in order to enable the AutoDJ feature on your account. *Please note that you will first need to 'Stop' your server before you are able to enable the feature under your 'Configuration' settings.
Under the 'AutoDJ' settings you can also enter your stations 'Genre'.
*UPDATE Sept 2021 - In order to set up your streams 'Genres' when using the AutoDJ feature with Shoutcast v2.6+ servers, you now need to register an authhash with shoutcast.com to add them. For Icecast users, the 'Genre' settings can now be found under your 'Mount Points' settings 'Metadata Overrides' tab.
You also have various 'Crossfade' options and the ability to 'Apply replay gain' which will detect the volume levels of all of your uploaded tracks and then match them to one consistent level so that some tracks are not too loud or too quite.
*Please note that if you have the AutoDJ feature enabled on your account, in order to 'Start' your server you will first be required to upload some Mp3 files and have them added to an active playlist in order to start the server.
If you attempt to start the server without any files or playlists, you will not be able to start the server and you will receive the following error message “Stream could not be started: Unable to prepare playlist for source startup: Error creating playlist: No tracks exist in the active playlists for this account.”
Configuring the 'Mount Points' settings for the AutoDJ
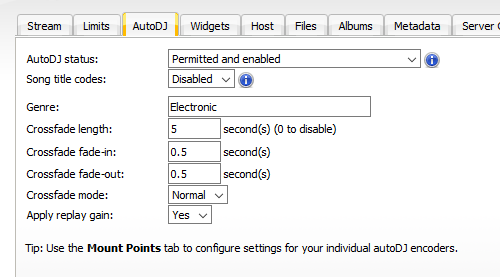
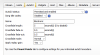
Next you need to navigate to the "Mount Points" tab of your 'Configuration' settings. You then have the following settings to configure for your default "/stream" mount point under the 'AutoDJ Settings' tab:
Use autoDJ –Select 'Yes'.
Mount point name – Enter your stations / stream title here.
Public – Set this to 'Yes' for a publicly available stream or 'No' to keep this private.
Audio encoder – Choose from either Mp3, Ogg/Opus or AAC.
Encoding type – We recommend leaving this set to 'Constant bitrate encoding (CBR)'.
Bitrate – Use the slider to determine the output bitrate for your stream.
Channels – Leave this set to the default of 'Stereo'.
Sample rate – Leave this set to the default of '44100 Hz'.

The 'File Manager'
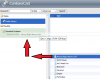
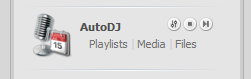
Next, to use the 'File Manager', just click on the 'Files' link under the AutoDJ menu in your severs control panel main overview.
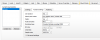
The 'Folder Browser' and 'File Browser'
By following the 'Files' link you are then presented with the 'Folder Browser' window to the left, and to the right is the 'File Browser' window. The 'Folder Browser' page provides an overview of the folders in your station's media library. The 'File Browser' provides a list of the files and sub-folders within a selected folder of your media library.

With the 'Folder Browser', you are able to expand or collapse any of your folders. To do this just double-click on a folder on the list. To view any files within a folder, click on the folder within the browser list. Any files that are contained within this folder will then be displayed in the 'File Browser' in the right window. For further menu options in the 'Folder Browser' you can right click on a folder which then provides options to 'Upload' or 'Paste' (These functions are described in more detail below).
With the 'File Browser', to select a file or sub-folder, just click on the file / sub-folder from within the list. Multiple files / sub-folders can be selected by holding 'Ctrl' or 'Shift' on your keyboard whilst clicking on the files / sub-folders. For further menu options in the 'File Browser' you can right click on a file / sub-folder which then provides options to 'Upload' / 'Copy' / 'Cut' / 'Paste' / 'Delete' / 'Rename' and to create a 'New Folder' (These functions are described in more detail below).
'File Manager' Operations
Along the bottom of the 'File Manager' window is a toolbar which provides several options to carry out the common file operations.

These operations include:
Upload – This will launch the 'File Uploader' interface. With this you can upload your audio files to your selected folders.
Copy – This copies any selected files to the clipboard so that they can then be copied into another folder.
Cut - This cuts any selected files to the clipboard so that they can then be moved into another folder.
Paste – This allows you to paste any files from the clipboard that have been cut or copied (as above) into a selected folder.
Delete – This permanently deletes any files.
Rename – This allows you to rename any selected file or folder.
'File Manager'
The 'File Manager' is used for uploading your Mp3 files to your media library. This interface can be launched by either using the 'Upload' button on the Folder / File browsers bottom toolbar, or by right clicking on a folder within the 'Folder Browser' or 'File Browser' menus.
Queuing Files for Upload
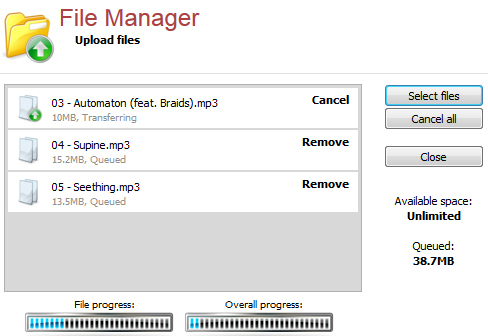
To begin uploading your files, you first need to queue them in the 'File Manager'. To select one or more files to upload, you need to click on the 'Select Files' button in the 'File Manager' window. You will then need to navigate to the location of your files on your computer and then select the chosen files and next click the 'Open' button of the pop up window. These selected files will then be added to the upload queue and instantly they will begin to be uploaded to the server.
Upload Progress
The 'File Progress' bar located at the bottom left of the window displays the real-time upload progress of the currently uploaded file.
The 'Overall Progress' bar located to the bottom right of the window displays the real-time progress for the entire upload queue.
Completed uploads are automatically removed from the queue.
Cancelling an Upload
You can cancel an upload at anytime by clicking on 'Cancel' next to the files name in the upload queue. If you wish to cancel all of the uploads just click on the 'Cancel All' button on the right of the 'File Manager' window.
'Folders Overview'
This section provides a brief overview of the folders that can be found in the 'Folder Browser' menu.
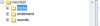
/media
This folder contains all of the media files for your stations AutoDJ media libraries. Any files that are uploaded to this folder are automatically added to your media library.
/ondemand
This folder contains any files that are for your stations 'On-Demand Content' widget. Any files that are uploaded to this folder are automatically added to your on-demand content.
/sounds
This folder contains files that are used for your stations 'Introduction' and 'Fallback' files. (* Please note that you should not change these files from within the 'File Manager' itself. We recommend using your servers 'Configuration' settings under the 'Files' tab to add or remove these files).

")
Enabling the 'AutoDJ' feature
First off, you are going to need to enable the AutoDJ feature on your account. In order to do this, first navigate to your servers 'Configuration' menu and then the 'Settings' link below this. Under the 'AutoDJ' tab's settings you will see the 'AutoDJ Status' drop down menu. Upon your account registration, this is automatically set by default to “Permitted, but disabled”. All you need to do is use this drop down menu to select “Permitted and enabled” and then click on 'Update' in order to enable the AutoDJ feature on your account. *Please note that you will first need to 'Stop' your server before you are able to enable the feature under your 'Configuration' settings.
Under the 'AutoDJ' settings you can also enter your stations 'Genre'.
*UPDATE Sept 2021 - In order to set up your streams 'Genres' when using the AutoDJ feature with Shoutcast v2.6+ servers, you now need to register an authhash with shoutcast.com to add them. For Icecast users, the 'Genre' settings can now be found under your 'Mount Points' settings 'Metadata Overrides' tab.
You also have various 'Crossfade' options and the ability to 'Apply replay gain' which will detect the volume levels of all of your uploaded tracks and then match them to one consistent level so that some tracks are not too loud or too quite.
*Please note that if you have the AutoDJ feature enabled on your account, in order to 'Start' your server you will first be required to upload some Mp3 files and have them added to an active playlist in order to start the server.
If you attempt to start the server without any files or playlists, you will not be able to start the server and you will receive the following error message “Stream could not be started: Unable to prepare playlist for source startup: Error creating playlist: No tracks exist in the active playlists for this account.”
Configuring the 'Mount Points' settings for the AutoDJ
Next you need to navigate to the "Mount Points" tab of your 'Configuration' settings. You then have the following settings to configure for your default "/stream" mount point under the 'AutoDJ Settings' tab:
Use autoDJ –Select 'Yes'.
Mount point name – Enter your stations / stream title here.
Public – Set this to 'Yes' for a publicly available stream or 'No' to keep this private.
Audio encoder – Choose from either Mp3, Ogg/Opus or AAC.
Encoding type – We recommend leaving this set to 'Constant bitrate encoding (CBR)'.
Bitrate – Use the slider to determine the output bitrate for your stream.
Channels – Leave this set to the default of 'Stereo'.
Sample rate – Leave this set to the default of '44100 Hz'.
The 'File Manager'
Next, to use the 'File Manager', just click on the 'Files' link under the AutoDJ menu in your severs control panel main overview.
The 'Folder Browser' and 'File Browser'
By following the 'Files' link you are then presented with the 'Folder Browser' window to the left, and to the right is the 'File Browser' window. The 'Folder Browser' page provides an overview of the folders in your station's media library. The 'File Browser' provides a list of the files and sub-folders within a selected folder of your media library.
With the 'Folder Browser', you are able to expand or collapse any of your folders. To do this just double-click on a folder on the list. To view any files within a folder, click on the folder within the browser list. Any files that are contained within this folder will then be displayed in the 'File Browser' in the right window. For further menu options in the 'Folder Browser' you can right click on a folder which then provides options to 'Upload' or 'Paste' (These functions are described in more detail below).
With the 'File Browser', to select a file or sub-folder, just click on the file / sub-folder from within the list. Multiple files / sub-folders can be selected by holding 'Ctrl' or 'Shift' on your keyboard whilst clicking on the files / sub-folders. For further menu options in the 'File Browser' you can right click on a file / sub-folder which then provides options to 'Upload' / 'Copy' / 'Cut' / 'Paste' / 'Delete' / 'Rename' and to create a 'New Folder' (These functions are described in more detail below).
'File Manager' Operations
Along the bottom of the 'File Manager' window is a toolbar which provides several options to carry out the common file operations.
These operations include:
Upload – This will launch the 'File Uploader' interface. With this you can upload your audio files to your selected folders.
Copy – This copies any selected files to the clipboard so that they can then be copied into another folder.
Cut - This cuts any selected files to the clipboard so that they can then be moved into another folder.
Paste – This allows you to paste any files from the clipboard that have been cut or copied (as above) into a selected folder.
Delete – This permanently deletes any files.
Rename – This allows you to rename any selected file or folder.
'File Manager'
The 'File Manager' is used for uploading your Mp3 files to your media library. This interface can be launched by either using the 'Upload' button on the Folder / File browsers bottom toolbar, or by right clicking on a folder within the 'Folder Browser' or 'File Browser' menus.
Queuing Files for Upload
To begin uploading your files, you first need to queue them in the 'File Manager'. To select one or more files to upload, you need to click on the 'Select Files' button in the 'File Manager' window. You will then need to navigate to the location of your files on your computer and then select the chosen files and next click the 'Open' button of the pop up window. These selected files will then be added to the upload queue and instantly they will begin to be uploaded to the server.
Upload Progress
The 'File Progress' bar located at the bottom left of the window displays the real-time upload progress of the currently uploaded file.
The 'Overall Progress' bar located to the bottom right of the window displays the real-time progress for the entire upload queue.
Completed uploads are automatically removed from the queue.
Cancelling an Upload
You can cancel an upload at anytime by clicking on 'Cancel' next to the files name in the upload queue. If you wish to cancel all of the uploads just click on the 'Cancel All' button on the right of the 'File Manager' window.
'Folders Overview'
This section provides a brief overview of the folders that can be found in the 'Folder Browser' menu.
/media
This folder contains all of the media files for your stations AutoDJ media libraries. Any files that are uploaded to this folder are automatically added to your media library.
/ondemand
This folder contains any files that are for your stations 'On-Demand Content' widget. Any files that are uploaded to this folder are automatically added to your on-demand content.
/sounds
This folder contains files that are used for your stations 'Introduction' and 'Fallback' files. (* Please note that you should not change these files from within the 'File Manager' itself. We recommend using your servers 'Configuration' settings under the 'Files' tab to add or remove these files).
Attachments
-
 auto_dj_files.jpg21.6 KB · Views: 19,550
 -
 file_manager_operations.jpg28.9 KB · Views: 18,859
 -
 folder_&_file_browser.jpg30.9 KB · Views: 20,613
 -
 folders_overview.jpg22.6 KB · Views: 17,877
 -
 file_manager_upload.jpg96.4 KB · Views: 18,725
 -
 enable_auto_dj.png13.9 KB · Views: 13,402
 -
 mountpoint_autodj_settings.png23.1 KB · Views: 13,102
Last edited: